Saturday, December 31, 2011

Simply Handmade card

Here's a card I made for my sister-in-law for her birthday. I can't remember who made the paper but I know the stamps are all by Hero Arts.

Until my next post,
Diane

Tuesday, December 27, 2011

Happy Bloggerversary to me!

Today marks my 3rd anniversary in the world of blogging. I haven't been keeping up very well this year. I got bitten by the genealogy bug so next year one of my resolutions is to spend a bit more time with the living than with the dead!

I didn't make an ATC for the entire year. I'm not promising I'll make them for 2012 but I do have some ideas to incorporate some family photos and mementos into my craft projects so I can do crafting and genealogy at the same time!

My craft resolutions are to use my Silhouette more and also to use my camera more.

Here's wishing you all a safe and prosperous 2012!

Until my next post,

Diane


Sunday, December 25, 2011

Merry Christmas!

I actually made more than just these cards for Christmas but in a rush to mail them I forgot to photograph them so these were the ones I hadn't sealed when I remembered to post them on the blog. These were made from a kits by WeR Memory Keepers.

Until my next post,
Diane

Sunday, December 18, 2011

Best Wishes Card

Here's a card I made for some good friends that are celebrating an anniversary. Like the birthday card I posted about the other day it is made with products from Hot Off the Press. All the hearts are backed with paper then cut out. This card used a design by Boxer Scrapbooks, they sell lots of Hot off the Press items.

Until my next post,

Diane

Monday, December 12, 2011

Cycles Birthday Card

Here's a birthday card I made for a nephew of mine. He's beyond riding a tricycle now and still has some other forms of riding to look forward to as he gets older. The stamps are all by Hero Arts. I saw the technique of using the embroidery floss as tassels on another card so I can't claim it as my own.

Until my next post,
Diane

Tuesday, December 6, 2011

Happy Birthday card

Here's a card I made for my niece. It uses papers and Dazzles by Hot off the Press. Dazzles are intricate laser cut stickers that have both an inner part and an outer part. This one uses the out part. The Dazzles appear delicate but are actually pretty sturdy. There is paper behind all but two of the balloons and ribbons. If you don't like dealing with sticky things that sometimes have a mind of your own you might want to stay away. But if you like beautiful embellishments that can become the focal point of your card and have patience then get some.

Until my next post,
Diane

Wednesday, November 30, 2011

Blast off Birthday Card

Here's a card I made for a nephew of mine that is having a birthday. I used the Rocket Age collection of paper and embellishments by October Afternoon.


Until my next post,
Diane

Thursday, November 24, 2011

Happy Thanksgiving 2011 - Happy Fall!

If memory serves me the inspiration for the layout of these cards was from the Mojo Monday Blog. I use their layouts along with others when I can't seem to find my mojo (which is quite often).

I forgot who made this paper collection but I just loved it and knew I'd be making cards with it.

Save some room for pie!

Until my next post,
Diane

Tuesday, November 22, 2011

Out My Window

The fall colors are about at their peak here. Overall our fall has been warm but we've had a few days where we turned on the heat. Here's a view out my window of my craft, computer, genealogy room.

Until my next post,
Diane

Thursday, November 17, 2011

Cupcake Birthday Card

Here's a card I made with supplies by Hot Off The Press. I took a class at the Great American Scrapbook Convention in Chantilly, VA this summer and one class was about using the Dazzles by HOTP. We adapted their kit which included making things other than cards and learned the techniques to make over 20 cards. I think I still have more supplies left so you'll be seeing cards like this for a while. This one has man type colors so it is enroute to a guy in my family, hope he likes it and has a great birthday.

Until my next post,
Diane

Saturday, November 12, 2011

Best Wishes Card

Here's a card I made for some friends that are celebrating a wedding anniversary. I made this card at a class, I think it was by SEI. Apologies if I am in error. It was a good value for the number of cards we made and the papers, stickers an embellishments go together well.

Until my next post,
Diane

Tuesday, November 8, 2011

Happy Day card

Here's a birthday card I made for my sister using paper from Echo Park. Not much to say on this one, it is pretty straight forward.

Until my next post,
Diane

Friday, November 4, 2011

To love a person card

Here's a card I made for my brothers anniversary. The bird image is a silhouette print and cut. The paper lace is also a silhouette cut image. The paper is from Creating Keepsakes, I got is last year at a convention for signing up in advance for a certain number of classes. It was a welcome surprise since it was unexpected.

Until my next post,
Diane

Monday, October 31, 2011

Happy Halloween!

Here's the second batch of cards I made for my family for Halloween this year. This was a combination of cards made from kits by WeR memory keepers and Basic Grey.  The one on the bottom left was my own "design". I used some small Halloween stamps and made a clear embossed background on the black paper. After that I latered som patterned paper and then some reflective stickers, that's why it didn't photograph too well. The one on the bottom right I made at last years stamp show at the make and take party.

Until my next post,
Diane

Monday, October 24, 2011

Happy Halloween first batch

Here's the first batch of card I made for my family for Halloween this year. These were all made using card kits from either WeR Memory Keepers or Basic Grey. Both sets were quite intricate but with the right tools easy enough to make. I'd recommend a small glue pen for the tiny parts. It looks like a pen but instead of writing with ink you actually write with liquid glue that dries pretty quick.

Until my next post,
Diane

Thursday, October 20, 2011

Happy Birthday Banner Card

Here's a card I made for a niece that is having a birthday. I have this stamp set by Hero Arts and made a mini banner by stamping this image on four different colored papers. After that I just added a piece of thick thread and then glued the pieces down as if it were a banner hung on the wall.

Until my next post,
Diane

Saturday, October 15, 2011

Giddy - up card

Here's a card I made in a class using images printed on acetate. The stamp on this card is a mega background by Impression Obsession. The inside sentiment says: "As a little girl, you probably dreamed of having a horse...May all of your dreams come true today and always!"

Until my next post,
Diane

Monday, October 10, 2011

Queen for a Day card

Here's another card made using the Boxer Scrapbooks layout. I used stamps by Crafty Secrets and some extra coordinating papers. My accents are a white pen and Fiskars border punch.

Until my next post,
Diane

Saturday, October 1, 2011

Thinking Of You Card


Here's a card I made for a relative that just underwent knee replacement surgery. So far all looks good. I hope the rehab goes well. She's looking forward to more activity and less pain.I made this card at a scrapbook convention. The class was taught by SEI. The class included a mini stamp set and a inkpad or two. They have some great techniques to use little stamps and make something big.

Until my next post,
Diane

Sunday, September 25, 2011

Thinking of You card


Here's a card I made for a relative that has recently finished up radiation treatment. So far all looks good so I wanted to let her know I was thinking of her. This card uses Echo Park paper and an image I stamped by Hero Arts. The tag is from.... I can't remember I think I got it in a discount area at JoAnns.

Until my next post,
Diane

Friday, September 9, 2011

My "new" craft/computer/genealogy room

Before Hurricane Irene paid us a visit a few weeks ago hubby and I tended to a few tasks like cleaning the yard of potential projectiles, getting gas for the generator, filling propane tanks and reviewing our disaster checklists. One of my tasks as the photographer of the family was to review photos I'd taken 8 years ago when Hurricane Isabel (another hurricane with an "I") wrecked havoc in the local area. I discovered that I needed to take some photos of new "stuff" as a memory jogger in case we had to file an insurance claim. Since I took photos of my new area I thought I'd share them with my internet friends.

Here's the FROG (family room over garage) or bonus room eight years ago. Like I said in my post a few months ago, I had a lot of "stuff". I consolidated some, sold some and will give some away.


As you can see this room was basically storage. Tucked into the right corner was hubby's computer space. Looks like we removed his laptop probably to take it with us when we evacuated. Our area was voluntary evacuations eight years ago and we might not have bugged out if we hadn't has a tornado take out a huge tree the two months before the hurricane hit. That spooked us so we left the area.

Flash forward 8 years and here's my new craft/computer/genealogy room.

This room is over the garage and is a few steps lower than the upstairs.
There's two staircases, one from a guest bedroom and one
directly from the kitchen.

There are twin dormers giving light from the north.
In between I've got two Ikea drawer cabinets and a multi purpose bookcase.


On the right side of the table is a matching multipurpose storage bookcase.
I got three of the same tables, the one that I use for crafting is a glass top
the other two are birch.

I bought matching mini shelves that hook onto the desk.
This way I can slide my printer and Silhouette digital
cutter under and still have storage on the desk.

As you can see I've still got a bunch of "stuff" to get rid of. The room also needs painting but we'll get to that later. I was thinking of removing the ceiling fan and having two light bars. I changed my mind early in the remodeling process. We had a few hot days early in the spring so I knew I'd need a fan since the twin windows right next to my computer face west. We replaced the old fan with a 52" five blade fan. Halogen lights are about as hot as incandescent and LED is too expensive so I'm using daylight CFL bulbs to get good light and keep it cool.

New lighting -- a ceiling fan and light bar.


When I get rid of more stuff maybe I can add a love seat or big chair so I can have an area to read.

Hope you enjoyed my show and tell.

Until my next post,

Diane

Sunday, September 4, 2011

Forgotten Technique card

I can't remember who I got this technique from. I made this card a while back and never wrote any notes on the back of the card like I do now. I'm using is as an anniversary card for my niece and hope she likes it.I know I used Ranger inks and a white pen to outline some of the flowers. I also outlined some of the swirls with a glitter pen.

Until my next post,

Wednesday, August 31, 2011

A fluffy little gift from the kitty card

Another card made with paper scraps using the layout I learned by Boxer Scrapbooks. I used a stamp by Inkadinkado. My accents are a white outline pen, a border punch by EK Success and a peel off on the outside borders.

Until my next post,
Diane

Sunday, August 28, 2011

We were lucky...Hurricane Irene the musical version

There were some deaths from this storm but hubby and I were among the lucky ones. We had some flickering now and then but didn't lose power or trees. Our back year is pretty soggy and will be for another couple of days. We were able to get the front yard cleaned up and hubby took two loads of debris to the local transfer station where they'll make mulch of it. We get our mulch there and may possibly be buying back our own lawn waste in a few months.

Here's my four song titles to describe Hurricane Irene. No need to look the lyrics since most of them don't really apply to a hurricane but the titles do.

1) The waiting is the hardest part (Tom Petty and the Heartbreakers)
2) Tomorrow (from the musical Annie)
3) Goodnight, Irene (Huddie Ledbetter/John Lomax)
4) I can see clearly now (Johnny Nash)

Friday, August 19, 2011

Dance for yourself card

Here's a card I made using Echo Park paper. I used an EK Success border punch on the blue border under the orange paper. The stamp is designed by Tim Holtz by Stampers Anonymous.

Until my next post,
Diane

Thursday, August 11, 2011

Thanks card

To regular followers my absence from blogging may have been noticed. I was posting at least twice a week last year and sometimes every other day. The black hole of genealogy caught me and sometimes I creep out and make a post here.

I have been crafting but it's for stuff in the future like Halloween, Thanksgiving and Christmas. I've got the first two holidays covered and made a big dent in the third. The family birthdays and anniversaries are slow this time of year so my cards have slacked off.

This card I sent to a relative of my husbands. When I was visiting his family last month I got with my mother-in-law and scanned a ton of family memorabilia she had for both sides of my husbands family. I noticed an envelope that had some great memories that were told by ancestors long gone and saw the return address. I asked her if she knew this man and was he still alive (he's close to 90 so you never know). She said yes so I copied that info down and called him the other day.

After establishing our relationship on the family tree I asked him if he could provide any more information. He's going to send me some info and I'm going to do the same as I've assembled a lot of information for the family tree.

This card is a thanks to he and his wife for taking time out to talk to a perfect stranger. It's a thanks for what he told me and also what he's going to send. I can't wait for it to arrive. The card itself is from a kit by WeR Memory Keepers, they make great kits as I've commented on in the past.

Until my next post,
Diane

Monday, August 1, 2011

Have your art and eat it too!

Judith G. Klausner is a food artist. I'm not talking about ice sculptures. Her art work is unconventional to say the least. Her work 2D work includes faux fabric art and designer wallpaper while her 3D sculptures use a variety of materials. She can create with incredible detail beautiful cameos on the inside of Oreo cookies. Check her out, it's worth a look.

Until my next post,
Diane

Thursday, July 28, 2011

Simple Moments card

I made this card for a good friend of mine. I used Echo Park paper and Cuttlebug embossed butterflies. The stamped image is from Cloud 9. She is forever 29 just like me!

Until my next post,
Diane

Sunday, July 24, 2011

Plastic art?

Have you heard of sea glass? It is glass from ordinary man made objects like bottles, glasses and such that has been tumbled by the waves of the sea to take the sharp edges out of it and appears like a gem of sorts.

What about sea plastic? Unlike glass which can weather and deteriorate with time plastic lasts much longer and retains much of it's original shape and colors. What do you do with the plastic stuff you find along a beach? Here's a great article on some folks that are making art out of found plastic items from beaches. If you'd like to see some examples look here.

Until my next post,
Diane

Wednesday, July 20, 2011

Get Well Soon card

Here's a card I made for a family member that recently underwent surgery. I used items from a Paper Wishes kit that focused on their Dazzles. Dazzles started off as metallic (silver or gold) die cut stickers that almost look like embossing. They are quite intricate and a bit time consuming to apply given the design. A transfer sheet helps you apply words so they don't get crooked and also to use the inside of certain designs.

Until my next post,
Diane

Saturday, July 16, 2011

The future of art

When my niece said she was majoring in Art back in the 90's (back before I retired and found my interest in art) I thought to myself "what is this girl doing". I thought unless she was a talent like Picasso or Dali she'd never make a living.  She switched her major from art to elementary education and taught "regular" classes for a few years. Then a position as an art teacher opened and flash forward to today she is an elementary art teacher. I take a look at her web site from time to time and feel comfortable that the young ones, in her area at least, are getting a good foundation to release their creative energies. I like the use of a variety of materials, incorporating some 3D work like sculpture and their use of colors.

Until my next post,
Diane

Tuesday, July 12, 2011

Are we there yet card

If this layout looks familiar to you then you must be a regular viewer of my blog. This is another travel card using a Sheetload template with the American Crafts kit. The stamp on this card is from Cloud 9 designs. I also used a Spellbinder template to cut out the blue scalloped square.

This card is for my niece and her family taking a trip to Disneyworld. Here's hoping for sunny but not too hot temperatures and short lines.

Until my next post,
Diane

Friday, July 8, 2011

Dream Big card

This is another card I made in a class by Technique Tuesday. We used some of their chipboard accents that we colored with the direct to paper technique. The colors and brads definitely make it a masculine card. After the class was over we still had some supplies left over so it was a good value.

Until my next post,
Diane

Monday, July 4, 2011

Happy 4th of July! 2011

Here's a set of cards I made using a WeR Memory Keepers card kit. I added a bit of glitter pen to most of them. The one on the bottom left I modified since it was supposed to be a thanks for the party type card. I used Studio G stamps to make it a generic 4th of July card. Like the other card kits by WeR Memory Keepers this was a very nice kit all parts fit well and even better since I got it on sale!

Until my next post,
Diane

Thursday, June 30, 2011

This is the good stuff, enjoy card

Here's I card I made using some print and cut images with my Silhouette. Using your Silhouette you select the image(s) you want to print. Make sure you print the registration marks too. Now that the images are printed you insert that paper into the Silhouette and the digital cutter finds the edges of the images and cuts them out. Is that cool or what?!? This card is for the son of a close friend. He's too young to have grown up with these type of cars but appreciates them nonetheless.

Until my next post,
Diane

Sunday, June 26, 2011

You Are Here card

Some of my family members are traveling this summer. My sister-in-law and her family are making a big trip overseas to Italy for two weeks. Just in case they don't know where they are when they land this card will tell them...you are here.

I made this card by using an American Crafts page kit but cut the paper using a Sheetload pattern. Sheetload stopped offering free desings in Dec 2009 but I downloaded all the templates and decided it was time to use one again.

Until my next post,
Diane

Wednesday, June 22, 2011

Power Tools Rule card

Here's another guy type birthday card. I can't remember the manufacturer but there was a set of coordinating paper and embellishments. I used Fiskars scissors to get a saw type cut on the edge of the blue paper and a few brads as an embellishment.

Until my next post,
Diane

Saturday, June 18, 2011

Just Thinking About You Card

Here's I card I made with a WeR Memory Keepers Kit. Even though it has flower elements I thought the colors would work for a guy birthday card. As I've previously mentioned their card kits are made very well so don't hesitate to make a purchase if you see one.

Until my next post,
Diane

Tuesday, June 14, 2011

Congrats card

My nephew is graduating high school so I made this card for him. I attended a class at a convention last year and when I made this card I set it aside for him. It is from Boxer Scrapbooks.

Until my next post,
Diane

Sunday, June 12, 2011

What an eye...

I recently got an email announcing a live event by Kelby Training spotlighting a day with Jay Maisel. I wasn't sure what it was about and I didn't watch it. I'm lucky though because I have a subscription to Kelby Training so I was able to watch it after the fact.

In one of the sessions Jay tells Scott Kelby that of a slide show of about 360 images only 3 where changed. By changed he means cropped. They continue to talk about getting picture right in the camera and limiting the editing or cropping after the fact. Scott has a had time with this and later in this session Scott says "Jay I don't know if you realize it but I use a program called Adobe Photoshop and Jay responds "I've heard of it".

Check out some of Jay's work at http://www.jaymaisel.com/recent-work/

Until my next post,
Diane

Friday, June 10, 2011

So Happy For You Two card

Hard to believe a year has gone by since hubby and I attended a wedding for Victoria and Chris. The not so newlyweds are doing well. I made this card using a kit from WeR Memory Keepers. I think their kits give very professional results. The score lines on the cards are perfect the embellishments and coordinating papers make for some great cards. Best of all I got all of these kits on sale!

Until my next post,
Diane

Tuesday, June 7, 2011

You're only a kid once card - another version

I have used this phrase on another card but this one uses the image that came with the mini stamp set by Inkadinkado. The design is... you guessed by Boxer Scrapbooks that I learned at a make and take.
I used some left over papers and then added my accents of Sakura gel pens, corner punches and a peel off.

Until my next post,
Diane

Friday, June 3, 2011

Wishes card

Here's a card I made in a class by Technique Tuesday. They have a bunch of really small stamps that you can use to make borders or repetitive patterns. We used a bit of stickles but it is still a masculine card. The accent is ribbon that we distressed a bit and then stamped on it.

Until my next post,
Diane

Monday, May 30, 2011

Home Improvement Card

Like many American's I've got a relative (or friend) deployed in the desert. Along with a care package of snacks and things to give to the kids over there I sent him this card. Why send a Home Improvement card to a guy deployed? Well for one I don't have a lot of "guy" cards hanging around and I wanted to send this to him sooner than later. Also, I figure he'll have a lot of honey-do projects when he comes back after his tour.

Until my next post,
Diane

Friday, May 27, 2011

My First Zentangles

This year at Art and Soul I took a class on beginning Zentangle with Suzanne McNeill. Along with being a CZT (Certified Zentangle Teacher) she is the owner of Design Originals a craft book publishing company. Take a look at her apron and you can get an idea of her ability to make Zentangles.

We stared with a small one (the one on the upper left and made five patterns. After that we did a bit of shading (I need to work on mine in the future). Then we tried white gel pen on black paper, luckily no shading is necessary).

After lunch, we all chose a stencil and used both a .01 and a .05 Micron Pen and learned a few more patterns. I improvised in the top part of my pumpkin stencil with what I filled in on the stem and leaf. I also did a bit of highlighting with the white pen.

Our last exercise was to decorate the outer edge of the very small stamped image in the center. I got a bit out of control and was accused of being an over achiever.

My two tips for doing Zentangles are 1) use your reading glasses if you have them. By the end of the day my eyes were very tired. 2) work in an area with good lighting. The convention center lighting was also a contributing factor to my tired eyes.

All in all a very enjoyable class, Suzanne's personality is suited to teaching this type of class. We left with a great journal to do more tangles in. We also got two Micron pens, a white gel pen and a bunch of handouts from Suzanne to use in future exercises.

WARNING: Zentangles can be addictive. Look for more by me in the future. Don't say you never got got the word.

Until my next post,

Diane

Monday, May 23, 2011

Art and Soul 2011 Project teaser

This year for the Hampton Art and Soul I took all three classes with Ingrid Dijkers. This was her first time teaching at Art and Soul and I hope she comes back. Her work has a great whimsical quality to it but still on the edge. As a matter of fact the first class I took with her was called An Instructional Guide for Going over the Edge.

Before I go into more detail let me first say that there is no way you'll accomplish an entire journal in a one day class of hers BUT don't let that dissuade you at all.

The first class was filled with loads of tutorials on her techniques for painting and all the different ways she has to make a boring rectangular journal page into something very special. She uses all sorts of templates and we traced them so we could have them for later use. We also got a great explanation of how to jazz up the edges of papers by sewing yarns, beads or buttons on the edge. Some of the sewing is with thread but some with wire.
Our kits included the covers in the form of a binder for day one and three or wood for day two. We also got loads of journal prompts and a nice selection of the same imagery she used in her three journals.

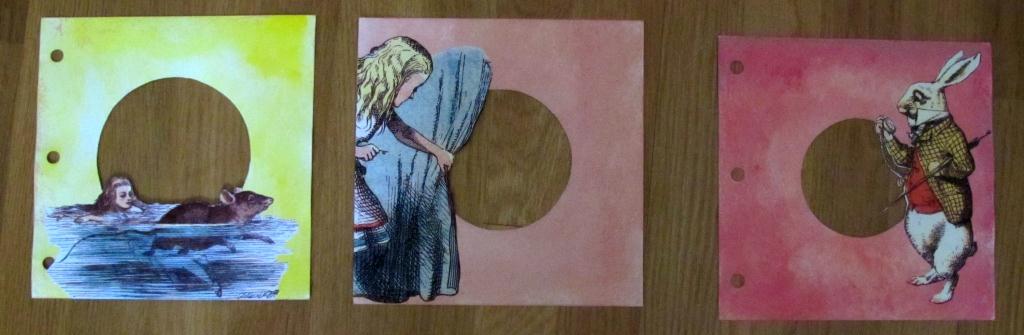
I got more done on day two which was called Through the Rabbit Hole. All my pages (front and back) have been painted and I've applied Ingrid's double-sided imagery to three pages.

I concur with a classmate that said she didn't feel that bad about not finishing because we didn't have complicated stitching to try to remember after the fact and it is easy to add pages because of the three ring binding concept.

The last day was the Octopus's Garden a Steampunk inspired journal. Again all my pages are prepared front and back and one image applied - the Bunny Man. I also cut my binder down to size.

I encourage you to take a class with Ingrid your journal pages will never look the same again.

Until my next post,
Diane

Thursday, May 19, 2011

Calendar Card

Here's another card I made with the Technique Junkies Waxed Cuttlebug technique. This one is a bit different since I didn't stamp on it before I ironed the embossed waxed paper. I used stamps from Inque for the outside and Fiskars for the inside. The inside says "Happy Birthday" "may all your wishes come true".

Until my next post,
Diane